The burn – sunburn, whipped body butter for sunburns

I am what is called a sun worshipper, give me any excuse to lie in the sun and catch a tan, I’m all over it. Theres something about Casper the Ghost white that’s just not for me, understandable for the winter months but not in Spring/Summer. Yes, I know that skin cancer is a real thing and that what I do is dangerous, this is not lost on me and I would encourage everyone to use high SPF levels of sunscreen whilst out in the sun. Naturally, this means that Im a do as I say, not as a do kind of person.

The weather in the Netherlands has been AMAZING this week, which is rare, unusual and unprecedented, which means that I naturally had to take advantage of it (I can’t begin to express how happy that I am winter is over and hopefully all the grey with it). It started out with a farmers tan, sitting in the back garden with the cats whilst reading, if the cats are happy in the sun, then I’m happy in the sun.

I had a light bulb moment of realising that I’m not far from the coast or the beach, hooray! Given that the hottest day of the year to date was being predicted, I decided to take advantage of it and go to the beach, that’s probably where I should have realised it was a bad idea and I would have been better in the garden with the cats.

I am a pampered princess, I can’t deny it. I’m a creature of luxury and camping or roughing it in any form has never been for me. My mother taught me at a young age that ‘camping’ was staying in a 2 star hotel or a motel and this is something that has been ingrained me in since a young child, which probably explains a lot about me.

I opted for what is considered to be the most popular beach near Amsterdam, Zandvoort aan Zee. I have to say that I was disappointed because it just wasn’t as nice as I was expecting. I understand that after spending a lot of time in Spain, its clean beaches and nice pools have ruined me. I just wasnt expecting dog excrement amongst the debris on the beach, it just added an extra level of grossness for me, which then heightened my germ OCD. I spent a few hours at the beach, quite literally sizzling like bacon in the sun and long enough to be utterly covered in sand, despite never leaving my blanket. I havent been quite so happy to get home and take a shower in a long time.

On the way home I was feeling ‘warm’, my skin was starting to feel more tender than wagyu beef and a tenderloin put together. I hoped that it was my skin turning into a healthy brown glow… no, no it was not. By the time I got home, I realised that I needed to start applying moisturisers and lotions and basically anything that would make it less ouchy (technical term). I decided to have a look too, you know, in the mirror to see how bad it was…. So I did my own version of The Scream by Edvard Munch and realised why it hurt when I sat down, because my legs (and all other areas) were various shades of red. I can already tell that I’m going to peel, which does not give me something to look forward to.


Sometimes aloe vera isn’t enough and that Id decided to make a body butter specifically for sunburns. Heres my body butter for sunburn, whilst it did help, it sadly wasn’t the overnight remedy I was looking for. I’m currently on day 2 of rubbing various potions into my skin to make it better. Yes the red is less, which is good but it does still hurt to sleep/lay down/move or wear any form of form-fitting clothing. Best decision made on the day was not to opt for the nudist beach because quite frankly, no one needs burnt bits!

1524219409126

DIY Whipped Body Butter For Sunburn

Makes: 240g(ish) Prep time: 5 mins Cooling time: 3+ hours Overall time: 4 hours minimum

  • 1/3 C (75g) Shea butter
  • 1/3 C (75g) Cocoa butter
  • 3 tablespoons (45g) Mango butter
  • 1/8 cup (25g) Coconut oil
  • 2 teaspoons (10ml) Sweet almond oil
  • 2 teaspoons (10ml) Castor oil – I use camomile infused version that I’ve made myself
  • 1 teaspoon (5ml) Advocado oil
  • 1 teaspoon (5ml) Apricot Kernel Oil
  • 1 teaspoon Vitamin E oil
  • 1 tablespoon of cornstarch (this takes out some of the greasy feel but not entirely)
  • 3 drops of each of the essential oils– Peppermint, Lavender, Tea tree, Frankincense, Eucalyptus and Lemon
  • Clean pots to put your product into or when all else fails, Tupperware!

How to make this burn healing body butter:

1. Over a double boiler combine the shea butter, cocoa butter, coconut oil, mango butter, sweet almond oil, castor oil, avocado oil and apricot kernel oil. Once its all completely melted, combined and no lumps at all, remove from the heat.

2. Allow your mixture to cool for 15-20 minutes. Once it has cooled down, add in your essential oils, vitamin e oil and cornstarch (you may want to sieve this in to avoid any lumps or beat very vigorously until they have all been mixed). If you add the essential oil whilst your butters and oils are melting or still very hot, they will be damaged by temperatures in excess of 100F (38C). This can result in reducing their therapeutic value and may cause skin irritation.

3. Now the waiting game starts, you need to wait for the mixture to cool down to the point that it has solidified before you can start whipping it. For me, this literally took HOURS (and given that I was feeling the burn, it felt much longer!). You want the mixture to be more of a solid and have no liquid like texture, so when you put the beaters in your mixture, you can visibly see where the beaters touched. Once it is good to go, use your hand mixer and whip it good! I whipped mine for easily 5 minutes but probably closer to 10, you want medium peaks but not soft floppy peaks.

4. Now to take your whipped body butter and put it in a pot and label them. I made two pots of 60g and one pot of 120g. When putting it in the pot, you will need to tap the air out of the pot where you’re putting it in the pot. I lightly (or not so lightly) tap the pot against a counter top to release any air bubbles in the pot, yes, this does make the lotion slightly less airy but not enough to make a difference and it ensures you fill your pot entirely.


Why I used the essential oils that I did?

  • Peppermint: is a natural painkiller and helps soothe burnt areas by providing a cooling sensation.
  • Lavender: reduces the sting of burns and reduces redness. Due to its antimicrobial properties, it’ll speed up healing, allowing your body to recover faster.
  • Frankincense: helps to rejuvenate the skin by hydrating and providing the necessary moisture (and is generally awesome for skin).
  • Eucalyptus:  it numbs the pain, has antibacterial properties that protect the sensitive, sunburned skin from infection.
  • Lemon: speeds up healing
  • Tea tree: has anti-inflammatory properties which help to prevent infection and swelling following a sunburn.

Honestly there are tons of other essential oils that you could add, so you can play around with it and swap out different oils if you wanted or didn’t like the scent of a specific one.

*Notes: you do not have to whip this body butter, you can use it as is once it’s solidified, however, whipping it gives it a fluffier and lighter texture. This body butter does have a greasy texture

*When making body butters, potions, lotions, soaps or any body product, always make sure that the equipment, spoons, bowls etc you use will NEVER be used for edible purposes again and are only used to make body products with.

*When using any essential oils directly or indirectly on skin, ensure that you stay out of sunlight or UV rays for up to 12 hours after application. This might sound quirky but as per this article, the combination of sun and essential oils can cause the skin to severely burn and blister.

Remember to share with friends or just keep it all for yourself! 🙂

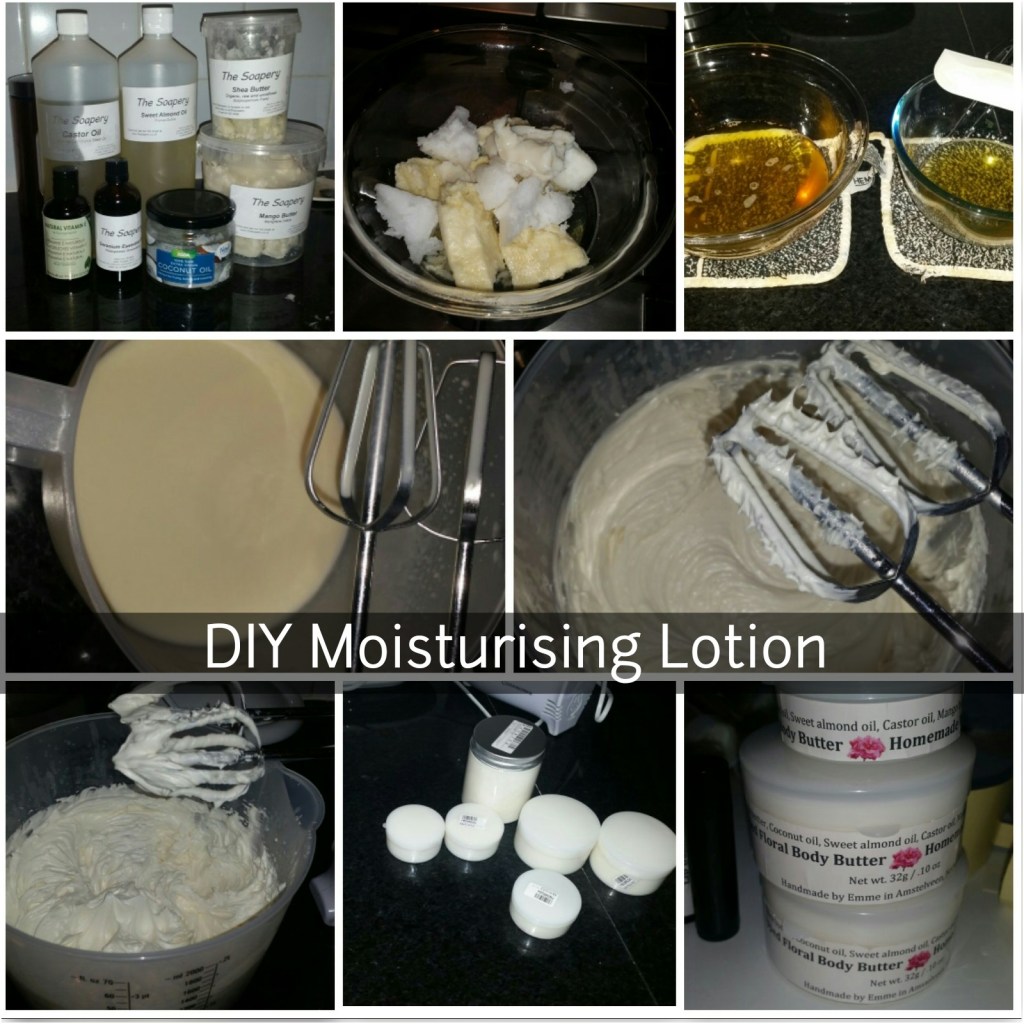
DIY Moisturising Body Butter for ladies

Recently I did a tutorial on body butter for men, it’s a great whipped body butter and I’ve been told that it works a great and also works well for psoriasis by my aunt.

20171112_202154.jpg

I’m currently in the states for turkey day (sorry turkeys) and decided that not only would I bring a LOT and I mean a LOT of soap that Ive made (as per the above picture) and I would make various lotions for the family. Just a quick note to say that whilst Europe seriously doesn’t seem to care about the transport of soap in your hand luggage, America’s TSA take personal offence at them (apparently the shape and weight make it very suspect), be prepared for questions and searches, even when you’ve already cleared two other security points! I decided that not only would I make lotion for my dad but Id also make some whipped body butter for my nana and mother (and secretly Id make something for myself). I made three versions of this (yes, I made a LOT of body butter for the lay-deez), geranium (Jesus, this is a scent that I honestly did not get on with, it actually made me gag and smelt nothing like roses! I was literally turning my head away as I whipped it trying not to breath), lemongrass, and tea tree and eucalyptus body butter.

Why this whipped body butter is good for you?

  • Shea butter: It contains vitamins A and E and is rich in fats that make it an excellent emollient and skin moisturising agent.
  • Coconut oil: It has antibacterial properties, protects against fungal infections and can prevent premature ageing.
  • Sweet almond oil: Enriched with vitamin E, monounsaturated fatty acids, proteins, potassium, zinc, and a number of other minerals and vitamins. It is a mild, hypoallergenic oil, it moisturises the skin without irritating it further, its good for eczema and psoriasis.
  • Castor oil: Heals inflamed skin, reduces acne, moisturises skin, fades blemishes, prevents stretch marks and reduces pigmentation.
  • Mango butter: Due to its rich minerals and vitamin content, it can heal scars. It is high linoleic and oleic acid content, making it good at maintaining the skin’s elasticity and flexibility.
  • Vitamin e oil: Can improve the appearance and texture of rough and dry skin due to its role in maintaining skin barrier function and helping the skin to retain water.

What is the difference between body butter and lotion? Good question and one that is frequently asked. Immediately you’ll notice that body butter is much ticker than lotion, this is because it has no water content (mine doesn’t). This  means a little goes a long way with body butter and provides longer lasting moisture. As lotion has a high(er) water content, it feels and applies lighter and absorbs much more quickly into the skin.

1511448581314

DIY Whipped Body Butter For Ladies

Makes: 210g(ish) Prep time: 5 mins Cooling time: 3+ hours Overall time: 4 hours minimum

  • 1/2 cup (110g) Shea butter
  • 1/4 cup (55g) Coconut oil
  • 1/4 cup (55g) Mango butter
  • 1/8 cup (30ml) Sweet almond oil
  • 1/8 cup (30ml) Castor oil
  • 1/2 teaspoon Vitamin E oil
  • 20 drops essential oil – as above, I made 3 batches which were geranium, lemongrass, and tea tree and eucalyptus – I added a few more drops to get a more intense scent
  • Clean pots to put your product into or when all else fails, tupperwear!

20171115_133019.jpg

How to make this girly body butter:

1. Over a double boiler combine the shea butter, coconut oil, sweet almond oil, castor oil, and mango butter. Once its all completely melted, combined and no lumps at all, remove from the heat. 20171115_133035.jpg

2. Allow your mixture to cool for 15-20 minutes. Once it has cooled down, add in your essential oil and vitamin e oil. If you add the essential oil whilst its melting or still very hot, they can be damaged by temperatures in excess of 100F (38C). This can result in reducing their therapeutic value and may cause skin irritation.20171115_134850.jpg

3. Now the waiting game starts, you need to wait for it all to cool down and start to solidify before you can start whipping it. For me, this literally took HOURS and HOURS. I tried beating it a few times in hope that it was ready and it just really wasn’t! In the end, I left it overnight (bottom left), and it was solidified and ready to be whipped. The top left and top right picture are the various stages of it solidifying and me trying to whip it and it just not working. Now that I have made so many of these, it really does whip best once its solidified. Once it is good to go, use your hand mixer and whip it good! I whipped mine for easily 5 minutes but probably closer to 10, you want medium peaks but not soft floppy peaks.

4. Now to take your whipped body butter and put it in a pot and label them. When putting it in the pot, you will need to tap the air out of the pot where you’re putting it in the pot. I lightly (or not so lightly) tap the pot against a counter top to release any air bubbles in the pot, yes, this does make the lotion slightly less airy but not enough to make a difference and it ensures you fill your pot entirely.

I created labels for the pots, so that there wasn’t a mystery as to what is in them. I used a glossy self adhesive printer paper (for laser, as thats what I have), measured the pots and changed the font according to the size of the pot. As with anything you’re giving to someone, its best to list all the ingredients to avoid any allergic reactions.

The great thing about this whipped body butter is that you dont need much at all, a little really does go a long way. I use it as a day and night cream for my face, along with as a lotion for my hands and body, so it really is an all in one body butter/cream. I personally like lemon grass as a face and body butter, as its not overly strong in scent and doesn’t seem to affect the scent if I wear a perfume. Tea tree and eucalyptus are also great for the same reason but does smell slightly more strong.

This is a great example of how truly easy it is to make your own products or products that will moisturise and nourish you and your family.

*Notes: you do not have to whip this body butter, you can use it as is once its solidified, however, whipping it gives it a fluffier and lighter texture.

*When making body butters, potions, lotions, soaps or any body product, always make sure that the equipment, spoons, bowls etc you use will NEVER be used for edible purposes again and are only used to make body products with.

*When using any essential oils directly or indirectly on skin, ensure that you stay out of sunlight or UV rays for up to 12 hours after application. This might sound quirky but as per this article, the combination of sun and essential oils can cause the skin to severely burn and blister.

Remember to share with friends or just keep it all for yourself! 🙂

DIY Whipped Body Butter For Men

Man products (as I like to call them) are totally underrated. I get that lotions, potions, balms, and scrubs are a girls paradise BUT men have needs too! Ok, we’re not talking about those kinds of needs… We’re talking soap, skin and lotions. I’ve been making what I call ‘Man Soap’ for a few years, it’s a basic soap with sandalwood essential oil with a bay leaf in the middle, giving it the essence of man and nature. I like to think men smell it and they automatically flex their muscles and beat their chests, ok ok ok, I know I’d be boring without my imagination! Seriously though, when you think products, you think girly stuff galore but you don’t really think dude wash, man lotion, or man maintenance products!

Cedarwood essential oil is GREAT for the skin and is known to treat dry skin conditions. My aunt has had great success (within a using it a few times) with treating her dry skin condition with this whipped body butter, where other ointments haven’t previously worked. (To be very clear, legally I’m not allowed to make any medical claims, as its not been through extensive laboratory testing)

My dad has super sensitive skin, something that I inherited. As a result he is incredibly limited in what he can use, as am I. My dad is also what you’d call a ‘mans man’, not the type that smashes beer cans on their chest but more the type that spends 80% of his life outdoors and wears a LOT of camouflage and not just when he’s outside. He’s also not the type to go to the store and spend more than 30 seconds in an aisle looking for lotion or comparing what the best or more natural product would be for him.

What is the difference between body butter and lotion? Good question and one that is frequently asked. Immediately you’ll notice that body butter is much ticker than lotion, this is because it has no water content (mine doesn’t). This  means a little goes a long way with body butter and provides longer lasting moisture. As lotion has a high(er) water content, it feels and applies lighter and absorbs much more quickly into the skin.

I wanted to make a super moisturising non greasy lotion that he could use in the winter or generally for dry skin that had a ‘manly’ scent, allowing him to avoid the beauty isle entirely.  I came across this recipe that I realised I was able to alter and make it my own!

1510597179687

DIY Whipped Body Butter For Men

Makes: 210g(ish) Prep time: 5 mins Cooling time: 3+ hours Overall time: 4 hours minimum

  • 1/2 cup (110g) Shea butter
  • 1/4 cup (55g) Coconut oil
  • 1/4 cup (55g) Mango butter
  • 1/8 cup (30ml) Sweet almond oil
  • 1/8 cup (30ml) Castor oil
  • 1/2 teaspoon Vitamin E oil
  • 20 drops cedarwood essential oil – I added a few more to get a more intense scent
  • Clean pots to put your product into or when all else fails, tupperwear!

How to make these manly products:

1. Over a double boiler combine the shea butter, coconut oil, sweet almond oil, castor oil, and mango butter. Once its all completely melted, combined and no lumps at all, remove from the heat. 20171113_110835

2. Allow your mixture to cool for 15-20 minutes. Once it has cooled down, add in your essential oil and vitamin e oil. If you add the essential oil whilst its melting or still very hot, they can be damaged by temperatures in excess of 100F (38C). This can result in reducing their therapeutic value and may cause skin irritation.

20171113_111657

3. Now the waiting game starts, you need to wait for it all to cool down and start to solidify before you can start whipping it. For me, this literally took HOURS. I tried beating it a few times in hope that it was ready and it just really wasn’t! So I’d leave it another hour and then go back. The picture on the left was an hour before it was ready. Once it is good to go, use your hand mixer and whip it good! I whipped mine for easily 5 minutes but probably closer to 10, you want medium peaks but not soft floppy peaks.

4. You need to put it in pots. This for me filled 1 large pot and 2.5 medium pots.

I also created labels for the pots, so that there wasn’t a mystery as to what is in them. I ensured that the logo was consistent with my soap and TADA my dad has his own range of man maintenance products!

The great thing about this whipped body butter is that you dont need much at all, a little really does go a long way. Start with the amount that is the size of a pea and work from there.

A female scented version of this recipe can be found here.

This is a great example of how truly easy it is to make your own products or to save your dad the hassle of the beauty isle!

*Notes: When making body butters, potions, lotions, soaps or any body product, always make sure that the equipment, spoons, bowls etc you use will NEVER be used for edible purposes again and are only used to make body products with.

*When using any essential oils directly or indirectly on skin, ensure that you stay out of sunlight or UV rays for up to 12 hours after application. This might sound quirky but as per this article, the combination of sun and essential oils can cause the skin to severely burn and blister.

**Before I forget (again), you can also make this for your boyfriend or husband, however, as you can tell Ive now been single for such a long time (after 5 years, you stop telling people the real amount of time) that I dont even think of these things and when I think of love, I have visions of my cat and only my cat. Yes, she is also the screensaver on my phone…

Remember to share with friends or your Dad! 🙂

*Edits: Legally I am not able to make any medical claims, Cedarwood essential oil is well documented in treating eczema and other skin conditions, which I believe is the element that makes this so good for dry skin conditions. I used it specifically for its woody masculine scent but it is also great for the skin!

DIY winter skin potion

As winter approaches you notice that you skin starts to feel less plump and healthy and  more dry and cracked. Sadly my skin has been breaking recently when I knock against something. Frustratingly, no matter how much store bought lotion I seem to apply, it doesn’t make a real difference. I figured if I can make soap and lip balms, why not have a go at making something stronger than lotions I already buy. Thats exactly what Ive done and have to say, I’ve been pleasantly surprised.

Based on the ingredients, I think this is more of a butter than a lotion, so Im just going to call it a potion. I have hyper sensitive skin and need to be careful as to what I use. For me, this is a winner. Naturally this wont stop me from making and trying out other lotion potiony recipes! 🙂

I thought I have this clever thing called Google, it can answer my many questions (sometimes I ask why more than a three year old) and typed in What is the difference between lotion and body butter, apparently this is a common question.  The answers varied but in short here is a summary: 

Body Oils soften and nourish the skin, as they resemble the natural oils in our skin they are easily absorbed. However, as oils are not water-based they may be more likely to cause breakouts, so its best to avoid acne prone areas such as back, face, and chest. Oils are ideally applied to warm, damp skin, like after a shower or bath.

Body lotions are lighter than body butter and oils, as they contain more water than oils and butters and absorb quickly as a result. It doesn’t moisturise as much or last/stay on as long as a butter or oil do. Lotions are better for skin that isn’t as dry or for people who tend to have oilier skin.

Body butter is the thickest of the three potions and they provide the strongest possible protective barrier to seal and lock in moisture. Body butter products are typically manufactured using a combination of carrier oils and essential butters. Body butters are applied to retain moisture, nourish the skin and lubricate.

Why this potion is good for you:

Shea butter is an excellent moisturiser for the face and the body. It locks in the moisture in the skin and keeps it hydrated for long, without clogging the pores, and is effective for dry skin.

Vitamin E oil is a nutrient to the skin whilst preventing and repairing radical damage.

Frankincense essential oil  can treat dry skin and reduce the appearance of wrinkles, age spots, scars, and stretch marks.

Peppermint essential oil gives a cooling sensation and has a calming effect on the body, which can relieve sore muscles.

Eucalyptus oil has a cooling and refreshing effect whilst having vast remedial and healing properties.

A few things you need to know about this homemade potion, it is sightly greasy to begin with but it absorbs well. Its quite hard to begin with but softens/melts quickly with the heat of your fingers. You dont need a lot, in-fact use less than the size of a single pea to start out with, if you need more, get a little bit more but dont go crazy with it to begin with. Im using it currently as a everything lotion, Ive used it on my hands, feet (dry heels) and face (at night). Ive found that this works great on super dry skin overnight.

potion

DIY winter Skin Potion

Makes: Just over a cups worth Prep time: 10 mins  Making time: 2.5 hours  Total time: 2 hours 40 mins minimum

  • 100g shea butter 
  • 20g mango butter
  • 5g  avocado oil
  • 15g apricot kernel oil (or you can remove Avocado and this oil and use coconut oil instead)
  • 25g beeswax
  • 2g of vitamin e oil
  • 3g frankincense essential oil
  • 2g peppermint essential oil
  • 2g eucalyptus essential oil

Unfortunately for the amounts Im using it became a big awkward trying to measure this with cups, so I gave it and pulled out my metric scales and it made life much easier! 

Now how to make this winter hydrating DIY potion:

If your beeswax is not already in pellet/small bead form, go ahead and grate it down. I use a cheap grater that I keep in my soaping box. This helps immensely when it all melts down, as the smaller pieces of wax melt more quickly (lesson learnt from previous potions).

wax

1. In a bowl or milk jug, combine the shea butter mango butter and beeswax. You can use a traditional double boiler (bain marie) with a glass bowl or go with my route, I use a milk jug (which I use specifically for my crafting/making ONLY) in a pan with water.

mix

2. Melt the ingredients over a low/medium heat in the double boiler. Do not rush this process, as you want the beeswax and butters to completely melt, which will solidify the potion making it creamy and rich. This should take between 10-15 mins. 

heat

3. Take your liquid potion mixture off the heat and allow to cool down slightly. Maybe 5-10 minutes, feel the pan/bowl, if its too hot to touch, its too warm to add in the oils.  

melt

4. Allow the mixture to cool slightly and add in the oils. You add them in after the oil is off the heat and cooled slightly, adding them before the mixture cools down will break down some of the therapeutic benefits of an essential oils (I forgot to shove the apricot kernel and avocado oil in the picture but I most certainly added it in).

oils

5. After mixing in your oils and giving it a good stir, go ahead and pour it into pots/containers. As I used rather small pots(13-30g), the solidified within from 5-20 minutes, as you can see the first pot was solidifying by the time I poured the last pot. 

pots 

This is no whip recipe, so once its become a solid, you’re done! As this mixture has beeswax, you really cannot whip it (believe me, Ive tried), it makes no difference. Once set, it is a hard potion that will soften with the heat of your fingers and skin when being applied.

potion

To use: Start with a pea sized amount and you’ll probably be surprised how moisturising it is and how just a little goes a long way.

Fancy some night time moisturising? Apply this potion liberally, massage and rub it in to your hands and feed for a few minutes and then put on a pair of cotton socks (or cotton gloves) after you apply the lotion. Leave overnight and your feet (or hands) will be moisturised and soft in the morning!

*Notes: When making body butters, potions, lotions, soaps or any body product, always make sure that the equipment, spoons, bowls etc you use will NEVER be used for edible purposes again and are only used to make body products with.

*When using any essential oils directly or indirectly on skin, ensure that you stay out of sunlight or UV rays for up to 12 hours after application. This might sound quirky but as per this article, the combination of sun and essential oils can cause the skin to severely burn and blister.

This works as great for your own dry skin and even better as a gift for friends and family, remember to share with friends and enjoy silky skin! 🙂